Ram 1500/2500/3500: Locating The LATCH Anchorages - Quad Cab/Mega Cab/Crew Cab
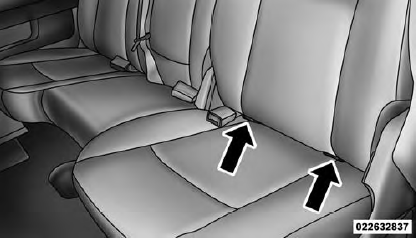
.png) The lower anchorages are round
bars that are
found at the rear of the seat cushion where it
meets the seatback. They are just visible when
you lean into the rear seat to install the child
restraint. You will easily feel them if you run your finger
along the gap between the seatback and seat cushion.
The lower anchorages are round
bars that are
found at the rear of the seat cushion where it
meets the seatback. They are just visible when
you lean into the rear seat to install the child
restraint. You will easily feel them if you run your finger
along the gap between the seatback and seat cushion.
Quad Cab/Mega Cab/Crew Cab Rear Outboard Seats
Driver Side
Locating The LATCH Anchorages
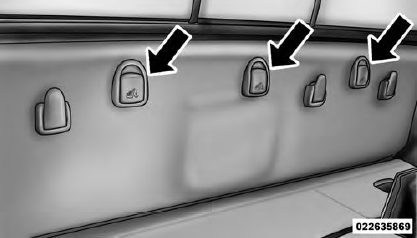
.png) In addition, Regular Cab models
have tether
strap anchorages behind the front center and
right seats. Quad Cab, Mega Cab and Crew
Cab models have tether strap anchorages located
behind each of the rear seats.
In addition, Regular Cab models
have tether
strap anchorages behind the front center and
right seats. Quad Cab, Mega Cab and Crew
Cab models have tether strap anchorages located
behind each of the rear seats.
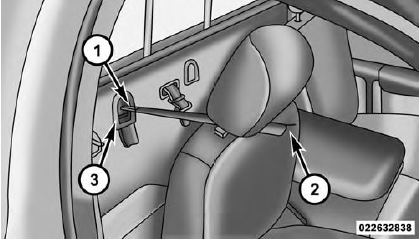
Regular Cab Tether Strap Mounting
- Tether Strap Hook
- Tether Strap to Child Restraint
- Tether Anchor
Mega Cab Tether Strap Mounting (Behind Covers)
ATCH-compatible child restraint systems will be equipped with a rigid bar or a flexible strap on each side.
Each will have a hook or connector to attach to the lower anchorage and a way to tighten the connection to the anchorage. Forward-facing child restraints and some rear-facing infant restraints will also be equipped with a tether strap. The tether strap will have a hook at the end to attach to the top tether anchorage and a way to tighten the strap after it is attached to the anchorage.
Center Seat LATCH - Standard Cab/Quad Cab/Crew Cab Full Bench
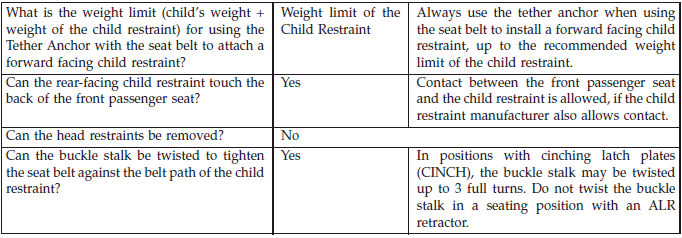
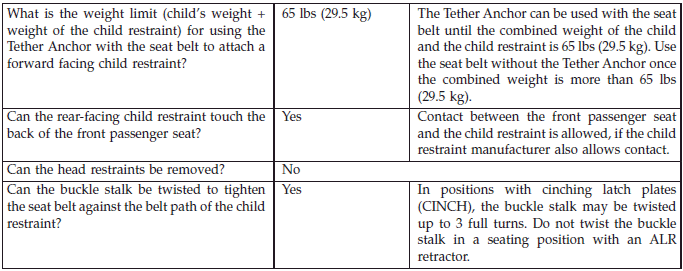
Do not install a child restraint in the center position using the LATCH system. Use the seat belt and tether anchor to install a child seat in the center seating position.
WARNING! Never use the same lower anchorage to attach more than one child restraint. Please refer to "Installing The LATCH Child Restraint System" for typical installation instructions.
Always follow the directions of the child restraint manufacturer when installing your child restraint. Not all child restraint systems will be installed as described here.
Center Seat LATCH - Quad Cab/Mega Cab/Crew Cab Split Bench
If a child restraint installed in the center position blocks the seat belt webbing or buckle for the outboard position, do not use that outboard position. If a child seat in the center position blocks the outboard LATCH anchors or seat belt, do not install a child seat in that outboard position.
WARNING! Never use the same lower anchorage to attach more than one child restraint. Please refer to "Installing The LATCH Child Restraint System" for typical installation instructions.
Always follow the directions of the child restraint manufacturer when installing your child restraint. Not all child restraint systems will be installed as described here.
To Install A LATCH-compatible Child Restraint
1. If the selected seating position has a Switchable Automatic Locking Retractor (ALR) seat belt, stow the seat belt following the instructions below. See the section "Installing Child Restraints Using the Vehicle Seat Belt" to check what type of seat belt each seating position has.
2. Loosen the adjusters on the lower straps and on the tether strap of the child seat so that you can more easily attach the hooks or connectors to the vehicle anchorages.
3. Place the child seat between the lower anchorages for that seating position. For some second row seats, you may need to recline the seat and/or raise the head restraint to get a better fit. If the rear seat can be moved forward and rearward in the vehicle, you may wish to move it to its rear-most position to make room for the child seat. You may also move the front seat forward to allow more room for the child seat.
4. Attach the lower hooks or connectors of the child restraint to the lower anchorages in the selected seating position.
5. If the child restraint has a tether strap, connect it to the top tether anchorage. See the section "Installing Child Restraints Using the Top Tether Anchorage" for directions to attach a tether anchor.
6. Tighten all of the straps as you push the child restraint rearward and downward into the seat. Remove slack in the straps according to the child restraint manufacturer's instructions.
7. Test that the child restraint is installed tightly by pulling back and forth on the child seat at the belt path. It should not move more than 1 inch (25.4 mm) in any direction.
How To Stow An Unused ALR Seatbelt
When using the LATCH attaching system to install a child restraint, stow all ALR seat belts that are not being used by other occupants or being used to secure child restraints. An unused belt could injure a child if they play with it and accidentally lock the seatbelt retractor. Before installing a child restraint using the LATCH system, buckle the seat belt behind the child restraint and out of the child's reach. If the buckled seat belt interferes with the child restraint installation, instead of buckling it behind the child restraint, route the seat belt through the child restraint belt path and then buckle it. Do not lock the seatbelt. Remind all children in the vehicle that the seat belts are not toys and that they should not play with them.
WARNING!
- Improper installation of a child restraint to the LATCH anchorages can lead to failure of an infant or child restraint. The child could be badly injured or killed. Follow the manufacturer's directions exactly when installing an infant or child restraint.
- Child restraint anchorages are designed to withstand only those loads imposed by correctly-fitted child restraints. Under no circumstances are they to be used for adult seat belts, harnesses, or for attaching other items or equipment to the vehicle.
Installing Child Restraints Using The Vehicle Seat Belt
The seat belts in the passenger seating positions are equipped with a Switchable Automatic Locking Retractor (ALR) that is designed to keep the lap portion of the seat belt tight around the child restraint so that it is not necessary to use a locking clip. The ALR retractor can be "switched" into a locked mode by pulling all of the webbing out of the retractor and then letting the webbing retract back into the retractor. If it is locked, the ALR will make a clicking noise while the webbing is pulled back into the retractor. For additional information on ALR, refer to the "Automatic Locking Mode" description under "Occupant Restraints."
Lap/Shoulder Belt Systems for Installing Child Restraints in this Vehicle
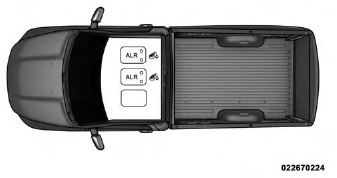
Standard Cab
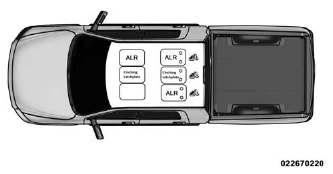
Quad Cab/Mega Cab/Crew Cab
Quad Cab/Crew Cab
Mega Cab/Standard Cab
READ NEXT:
 Installing A Child Restraint With A Switchable
Automatic Locking Retractor (ALR)
Installing A Child Restraint With A Switchable
Automatic Locking Retractor (ALR)
1. Place the child seat in the center of the seating
position. For some second row seats, you may need to
recline the seat and/or raise the head restraint to get a
better fit. If the rear seat can be
Installing A Child Restraint With A Cinching
Latch Plate (CINCH) - If Equipped
1. Place the child seat in the center of the seating
position. For some second row seats, you may need to
recline the seat and/or raise the head restraint to get a
better fit. If the rear seat can be
Installing Child Restraints Using The Top Tether
Anchorage
Regular and Mega Cab Trucks: In the regular cab truck,
the top tether anchorages are located behind the center
and right passenger seats. In the mega cab truck, the top
tether anchorages are located b
SEE MORE:
Summer Operation
The engine cooling system must be protected with a
high-quality antifreeze coolant to provide proper corrosion
protection and to protect against engine overheating.
OAT coolant (conforming to MS-12106) is recommended.
Refer to "Maintenance Procedures" in "Maintaining Your
Vehicle" for proper coola
Hill Climbing
Hill climbing requires good judgment and a good understanding
of your abilities and your vehicle's limitations.
Hills can cause serious problems. Some are just too steep
to climb and should not be attempted. You should always feel confident with the
vehicle and your abilities. You
should always cl
