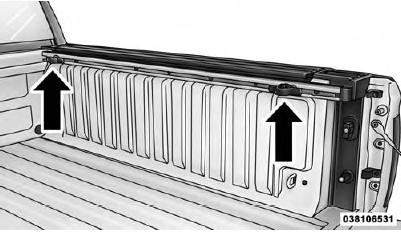
Ram 1500/2500/3500: Bed Rail Tie-Down System
CAUTION! The maximum load per cleat should not exceed 250 lbs (113 kg) and the angle of the load on each cleat should not exceed 45 degrees above horizontal, or damage to the cleat or cleat rail may occur.
There are two adjustable cleats on each side of the bed that can be used to assist in securing cargo.
Adjustable Cleats
Each cleat must be located and tightened down in one of the detents, along either rail, in order to keep cargo properly secure.
To move the cleat to any position on the rail, turn the nut counterclockwise, approximately three turns. Then pull out on the cleat and slide it to the detent nearest the desired location. Make sure the cleat is seated in the detent and tighten the nut.
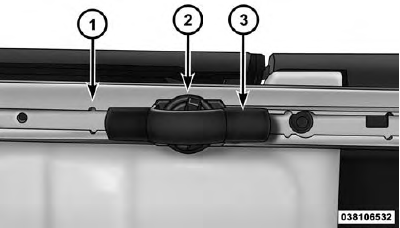
- Utility Rail Detent
- Cleat Retainer Nut
- Utility Rail Cleat
To remove the cleats from the utility rail, remove the end cap screw located in the center of the end cap, using a #T30 Torx head driver. Remove the end cap and slide the cleat off the end of the rail.
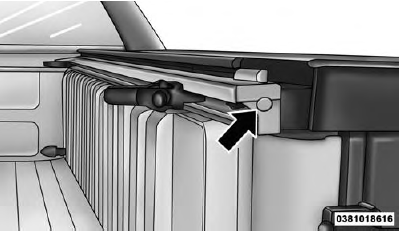
Utility Rail End Cap
READ NEXT:
 Slide-In Campers
Camper Applications
Certain truck models are not recommended for slide-in
campers. To determine if your vehicle is excluded, please
refer to the "Consumer Information Truck-Camper Loading"
document av
Easy-Off Tailgate
To simplify mounting of a camper unit with an overhang,
the tailgate can be removed.
NOTE: If your vehicle is equipped with a rear camera or
RKE the electrical connector must be disconnected prior
to
Tri-Fold Tonneau Cover - If Equipped
Your vehicle may be equipped with a Tri-Fold Tonneau
Cover which consists of different features:
Easy Tri-Fold cover
Tonneau fore aft locator
Crosscar inside bed locator
Front and rear clamps
St
SEE MORE:
Automatic Mode
The Stop/Start feature is enabled after every normal
customer engine start. It will remain in STOP/START
NOT READY until you drive forward with a vehicle
speed greater than 5 mph (8 km/h). At that time, the
system will go into STOP/START READY and if all other
conditions are met, can go into an STOP
Jump-Starting Procedures
If your vehicle has a discharged battery it can be jumpstarted
using a set of jumper cables and a battery in
another vehicle or by using a portable battery booster
pack. Jump-starting can be dangerous if done improperly
so please follow the procedures in this section carefully.
NOTE: When using a po
